Ballarms (110)
Replace the ballarms if the toes have a worn flat that exceeds .030 inch in
width.
Ballarm Bearings (111)
Replace rough or seized bearings. Replace bearing if measurable wear
marks were found on pins (106).
Pilot Valve Plunger (112)
The control and compensation land must not have nicks or scratches, and
sharp corners must be retained.
Thrust bearing (117)
Top and bottom races (116-118). Bearing race (116) must not be worn from
ballarm toes. The rollers in bearing (117) must be clean and roll freely.
Floating Lever (125)
Inspect for wear where droop pin contacts the lever. Inspect for wear in area
of contact with the speed setting lever.
Governor Assembly
To prepare to assemble the governor, lay the parts in an orderly fashion on a
clean dry work surface. Lubricate all O-rings with white petroleum jelly to facilitate
assembly.
Use only new O-rings, seals, gaskets and cotter pins. Careful, precise assembly
methods will save time and help to ensure correct calibration of the governor.
Torque all 1/4 - 20 screws to 90 lb-in (10 Nm).
Assembly Procedures
1. Install O-ring (128) on needle valve (127) and install it in case (26).
2. Install O-ring (130) on air bleed plug (129) and install it in case (26).
3. Install stop screws (34). Leave screws (1) on cover plate (35) loose until
after the governor is calibrated.
4. Assemble servo piston (103) and link (102). Start double diameter pin (104)
into the chamfered hole in servo piston (103). Align hole in link (102) with
pin, and press the pin in. Be sure the pin does not protrude from either side
of the piston. Install the piston assembly in the case.
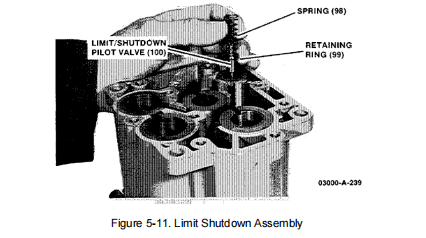
5. Turn case (26) bottom side up. Install retaining ring (99) on limit/shutdown
pilot valve (100). Install spring (98) on the spring seat of plunger (100) and
install this assembly in the case (Figure 5-11).
6. Install one buffer spring (97), buffer piston (101), and second buffer spring
(97) in the buffer bore of case (26).
7. Place base gasket (96) on case (26). Install and secure base (95) with
seven screws (75).


